Friday, 22 May 2015

How to Make Your Computer Speak Whatever You Type

Create your own text to speech converter software to make your computer speak whatever you type.
Steps
Make Your Computer Speak Whatever You Type Step 1 Version 2.jpg
1.   Open the Notepad.
2.   Copy the code given below and paste it to notepad
  • Dim message, sapi
    message=InputBox("What do you want me to say?","Speak to Me")
    Set sapi=CreateObject("sapi.spvoice")
    sapi.Speak message
Make Your Computer Speak Whatever You Type Step 3 Version 2.jpg
3.   Save the file with any name with an extension .vbs

4.   Run the file, type anything you want in the textbox and press OK.

5.   Enjoy !

Tips
  • vbs stands for Visual Basic Scripting.
  • Sentence marked in the double quotes in the code/script can be edited according to the user's choice.
Warnings
  • Make sure that you save the file as .vbs file.
  • This is meant for educational purpose only.
  • Do not edit the code, or it may result any other operation to execute. Doing so, the user is sole responsible for their own work. Only edit the code if you know what you're doing

How to Permanently Remove Files from Your Hard Drive

Simply putting files in the trash and emptying it leaves them on your hard drive in a form that is fairly easy to recover. This solution is free, and requires only a bit of time and access to an internet source. Follow some simple steps given below and Remove the files.

1.   Find a "low level format tool" application online by searching freeware sites.

2.   Format the partition on which you keep the files you want to get rid of, with the low level format tool. The easiest way is to find a bootable DOS floppy and copy the .exe program to it.

3.   Reboot the computer using the floppy disk and run the tool. The physical space on the hard drive where your files are saved will be filled with zeros or random data. Afterwards, you can recreate the partition and store new files without any problems.
With CCleaner
1.   Download and install CCleaner
2.   Open the tools menu and select the "Drive Wiper" sub-tab option.
3.   Select Wipe, select "Entire Drive (All data will be erased) " then Security.Determine how many passes it should take ("7 passes or 35 passes") and the drive you wish to wipe.
  • The more passes the lower the chance your data will be recoverable. However, more passes may make the process take longer to complete.
4.   Select Wipe: This process can take anywhere from a few minutes to days, depending on the number of passes and free space to recover. (400GB with 7 passes took me 8 hours)
Tips
  • To eliminate any data remnants, look for a wipe utility like FarStone TotalShredder, that operates outside the Windows OS.
  • If you know how to use DOS and have a boot disk, then you can use the "format X: /u" command which is an Unconditional Format Disk command that will, like above, write 0's across the whole drive or partition.
  • To completely and securely wipe ALL data from one or all drives in a system, try DBAN(Darik's Boot and Nuke). DBAN is free Open Source Software.
  • Use a utility like BCWipe to wipe only the empty space on a hard drive.
Warnings
  • It is nearly impossible to totally delete files in a hard drive unless you destroy the disk that is in the hard drive, otherwise, with some professional tools and equipment you can still read the data.
  • If you want to delete something, find a way to edit it with a program and junk it, then delete.
  • An HDD with bad sectors cannot be wiped as theses cannot be written to (READ ONLY), consequently those sectors will contain recoverable data.
  • This is a very difficult process for amateurs. If you have any doubt in your mind about what you are doing, it is much safer to find a trained professional.
  • There are even some professionals who can recover disks that have been for example burned, sawed in twice and then smashed with a sledge.
  • If you get a program called Recuva, from piriform.com, you can do a deep scan and find almost any files that were deleted (deep scan takes longer but it will definitely get the files it needs). Something is never deleted.
  • While data can technically never be fully deleted on a hard drive, so-called "government wipes" make the data all but unrecoverable. The only way to absolutely ensure that all traces of previous data are deleted is to destroy the drive and platters.
  • Please remember that because HDDs are made from cobalt oxide and iron (magnets) it is imposable with the aid of software to permanently erase (wipe) data. However it can be made more difficult to recover this data.

How to Protect Private Data on USB Flash Drive Using FreeOTFE

Note: Although this article refers to USB flash drives, you can encrypt your computer's hard drive just as easily!

You will be able to encrypt your entire compact disk, USB flash drive, USB memory stick or any other external storage device.

These instructions apply to both "FreeOTFE" and "FreeOTFE Explorer". They do the same thing, but have a slightly different user interface (FreeOTFE creates a virtual disk drive on your computer, Explorer has an explorer-like interface).

Both of them can be copied to a USB flash drive and carried around, but FreeOTFE Explorer is better for using on other peoples computers.

Steps

1.   Create a new virtual encrypted disk by clicking the "New" icon at the top and following the instructions in the wizard. Select "File based volume" when prompted
Protect Private Data on USB Flash Drive Using FreeOTFE Step 2Bullet1.jpg
2.   "Mount" the the disk by clicking the "Mount" icon at the top.
  • Entering the filename of the encrypted disk you just created, and it's password.
  • A new disk will then appear on your computer!


3.   Fill this disk with your private data

4.   Dismount the virtual encrypted drive using the "Dismount" item on the toolbar. This will cause the new disk to disappear, securing your data.
5.   Move the file-image to the CD, DVD, a USB flash drive, a USB memory stick or any other external storage device

6.   Copy the contents of C:\Program Files\FreeOTFE to the a new folder on your external storage device (you don't need to do this, but then you can take a copy of the software with you and use it on other computers)
Protect Private Data on USB Flash Drive Using FreeOTFE Step 2Bullet1.jpg
7.   To access your private data again, simply click the "Mount" button, and specify the filename of the file-image on your USB drive and your password.The disk will appear again, and you can use your data.

How to Create a Fake and Harmless Virus

Do you want to play a trick on your friends? Try this shocking but harmless virus. Read on to find out how to execute it.
Part 1 of 2: Building the Virus

1.   Run Notepad. Notepad will allow you to input text with very little formatting. Click Start -> All Programs -> Accessories -> Notepad.
  • If  you're on a Mac, use TextEdit.

2.   Input a small batch file. Put the following into your text file (without the bullets):
  • @echo off
  • echo Message here.
  • shutdown -s -f -t 60 -c "type a message you want to appear here."

3.   Click File, then Save As.
4.   Name your file.

5.  Change the .txt extension to .bat or .cmd. 
Create a Fake and Harmless Virus Step 6 Version 2.jpg
6.  Change the ".txt bar" to "All Files".
Create a Fake and Harmless Virus Step 7 Version 2.jpg
7.  Click Save.

8.  Close Notepad.
Part 2 of 2: Making a Fake Icon

1.   Right click on the desktop and go over to "New," then click "Shortcut".

2.     For the location of the shortcut, choose your virus.
Create a Fake and Harmless Virus Step 11 Version 2.jpg
3.    Click "Next".

4.    Give the shortcut a name that your victim will or might click on.
Create a Fake and Harmless Virus Step 13 Version 2.jpg
5.    Click on "Finish".

6.   Right click on the shortcut you have just made and choose "Properties".

7.   Click on the "Choose icon" button and scroll through the list of icons.

8.   Choose an icon that the name of your file. Click on it and hit "OK" twice.
  • Note that this will not work on Windows 7 Pro
Tips
  • Running batch files like these in full screen can make them even scarier and more convincing. Right click on the icon and chose Properties -> Options -> Full screen.
  • Do not shutdown the computer too early. It may not scare the victim or may not look like a virus.
  • It's even better if you name the virus "Internet Explorer" and change the icon to match. Save it to your desktop and delete the old internet shortcut so if they click to go on the internet, it shuts down on them.
  • Alternatively, set your 'virus' to execute every time a user logs in. Navigate to Start > All Programs > Startup (Right-click) > Open and copy the shortcut into the folder that opens. Be careful with the shutdown timer's value. Too long of an interval will make it easy for even the most computer illiterate people to deactivate the virus.
  • A safe mode boot will halt the Startup and the Registry Run key.
    If you really screwed up, boot a Live Linux distro and mount the hard drive. Once mounted, navigate to that directory and delete the file.
  • Alternatively, Choose a random shortcut icon from the desktop (Chrome for example) and change its target path to your batch file using properties. Whenever the user tries to open the software, the computer will shutdown.
Warnings
  • Do not execute such viruses on computers that must be available 24 hours a day, such as the ones in hospitals.
  • If you use a shutdown-countdown, you should have enough time to abort the countdown.
  • Only do this to someone who can handle such a prank!
  • Once this virus has been clicked on, there is often no way to stop it. However, if you need to terminate the shutdown for whatever reason, go to command prompt and type in this following command: "shutdown -a". It will immediately terminate the fake virus.

How to Shut Down a Computer Using Notepad

Notepad, Windows' free text editor, is also a competent code editing program. You can use some simple Windows commands in Notepad to create a file that will shut down your computer when you run it. This is great if you want to save some clicks for future shut downs, or you want to play a prank on a friend.

Steps
1.    Open Notepad. This is the free text editing program that comes with every version of Windows. You can use it to create a command that, when run, will shut down Windows for you.
  • You can find Notepad by clicking the Start menu and selecting "Programs" → "Accessories" → "Notepad". You can also click the Start menu, typenotepad, and press  Enter.
2.    Type .shutdown.exe -s on the first line. This is the command to shut down the computer.
3.    Add a timer by using the .-t flag. By default, the shutdown process will be delayed by 30 seconds. You can change this by using the -t gflag with the number of seconds you want to delay.
  • For example, to create a shutdown command that waits 45 seconds, typeshutdown.exe -s -t 45.
  • To create a shutdown command that shuts the computer down immediately, typeshutdown.exe -s -t 00.
4.    Add a message to be displayed. If you want, you can add a personalized message to the shut down notice by using the -c flag. Using the above example, typeshutdown.exe -s -t 45 -c "comment". The comment must be in quotes.[1]
  • For example, you can let the user know how long until the shutdown begins by typing shutdown.exe -s -t 45 -c "Computer will shut down in 45 seconds".
5.    Click "File" and select "Save As". You will need to save the file as a batch file, which Windows can execute to run the shutdown command.
6.    Click the "Save as type" drop-down menu and select "All Files (*.*)". This will allow you to change the file type.
7.    Delete the ..txt from the end of the file name. Replace it with .bat.
  • If you don't see the three letter file extensions,Click Here
8.    Save the file. A new copy will be created with the .bat extension, and it will have a different icon than a standard text file.
9.    Run the newly-created file to run your shutdown process. The shutdown will occur according to the rules you created.
  • Make sure you've saved anything you need to before running the shut down program.

How to Show File Extensions in Windows

By default, file extensions for known file types are hidden in Windows XP. However, you can change this setting so that file extensions are shown for files in a certain folder or for all files on your hard disk.
Steps
Show File Extensions in Windows Step 1.jpg
1.   Open any folder on your hard drive. It could be your Documents folder, Pictures, Videos, Computer, etc.
Show File Extensions in Windows Step 2.jpg
2.   Select the "Folder Options" tab from the Tools menu. A new window named "Folder Options" will appear.
Show File Extensions in Windows Step 3.jpg
3.   Click the View tab. This will show the file and folder view settings.
Show File Extensions in Windows Step 4.jpg
4.   Uncheck "Hide extensions for known file types". Then click Apply then OK to save the changes.

How to Do a Simple but Fun Google Trick

Google is loaded with tricks and Easter eggs. To do a simple, fun Google trick, try one of the following.
Method 1 of 2: Amusing Yourself

1.   Google zerg rush. Your search results will be attacked and destroyed by Google o’s – a reference to StarCraft.
2.   Google the answer to life, the universe, and everything. The Google calculator will tell you that this is 42 – a reference to The Hitchhiker’s Guide to the Galaxy.
3.   Google do a barrel roll. The results page will do a full spin.

4.   Go to Google translate. Set the translated language to German, type any combination of the words pvbschkzk, and kkkkkkk, and press the audio button at the bottom right. Write at least five of these phrases (the more the better) and they will be played back to you in beatbox.

5.   Google tilt or askew. Your search results will sit at an angle.

6.   Google binary. The number of search results will be written in binary.

7.   Go to google.com/webhp?hl=xx-pirate. All the Google content will be translated into pirate.

8.   Google the loneliest number. The Google calculator will tell you that this is 1.

9.   Go to google.com/pacman. The Google logo will become a playable Pacman game.

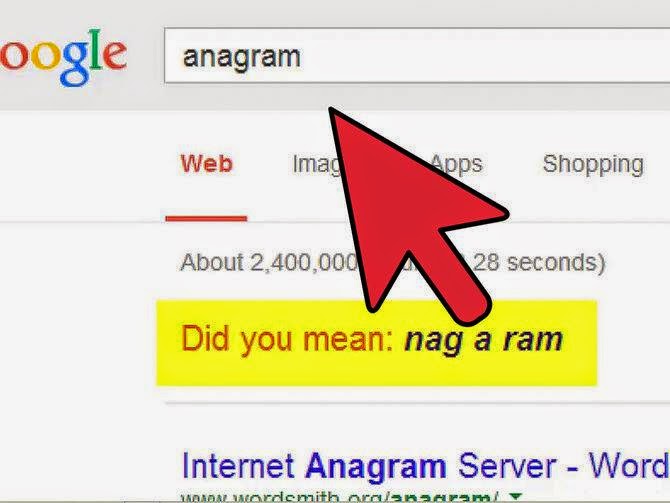
10.   Write "anagram" in Google search. It will say: "Do you mean, "nag a ram"?
Method 2 of 2: Tricking Your Friends

1.   Go to darkartsmedia.com/google.html. Here, you will see a web page that looks similar to Google.
Do a Simple but Fun Google Trick Step 12 Version 3.jpg
2.   Place your fingers over the oo in Google.
Do a Simple but Fun Google Trick Step 13 Version 3.jpg
3.   Click anywhere outside of the search box.
Do a Simple but Fun Google Trick Step 14 Version 3.jpg
4.   Wait 3 seconds before removing your fingers. The oo is now gone.
Do a Simple but Fun Google Trick Step 15 Version 3.jpg
5.   Place your fingers back over the spot where the oo belongs and rub them gently back and forth.
Do a Simple but Fun Google Trick Step 16 Version 3.jpg
6.   Click anywhere outside of the search box.
Do a Simple but Fun Google Trick Step 17 Version 3.jpg
7.   Wait 3 seconds before removing your fingers. The oo has now reappeared.
Do a Simple but Fun Google Trick Step 18 Version 3.jpg
8.   Click anywhere outside of the search box and you will be directed to the real Google.